|
|
|---|
Thursday, October 29, 2009
interesting footwear Collection
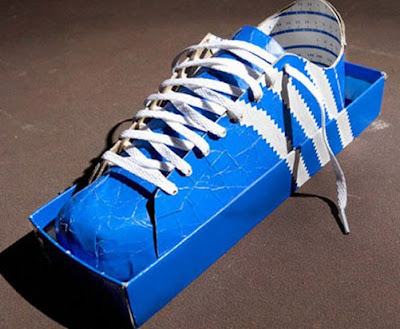
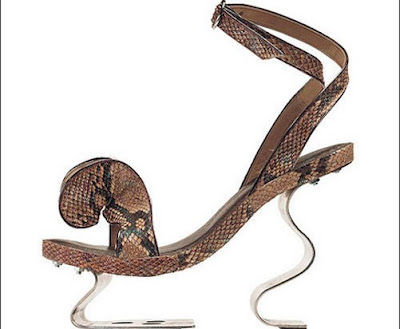
A photo collection of weirdly designed shoes. The cardboard shoe above would definitely steal the dorky limelight at any party. 13 more pics of weird shoes after the jump.
Sunday, October 25, 2009
car ice Transparent
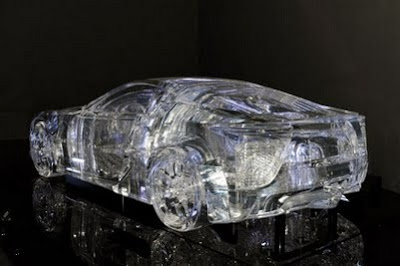
This amazing full-size transparent sculpture of Lexus' new $375,000 LFA supercar that was constructed by Scu Fujimoto, a noted Japanese architect. The sculpture was first displayed at the Milan Design Week earlier this year and is simply stunning to look at. What's most impressive is that details like the seats, instrument panel, engine, suspension, and transaxle can all be seen.
According to Lexus, the sculpture is constructed from transparent acrylic boards that have been sanded and polished.
According to Lexus, the sculpture is constructed from transparent acrylic boards that have been sanded and polished.
Wednesday, October 21, 2009
Pizza and Dough
I can't take all the credit. Or any of it, really. This is my friend Lisa's recipe. But I use it for everything--pocket sandwiches (like Hot Pockets, only not gross), breakfast pocket sandwiches, pizza crust, pizza pockets, whatever. I actually have this recipe printed out, laminated, and hung on the inside of one of my cupboard doors. One major advantage is that this dough is very, very forgiving, so a it's great yeast dough to start with if you're a yeast dough virgin.
Breadsticks
print recipe text only
1 1/2 c. warm (105-115 degrees) water
1 Tbsp. sugar
1 Tbsp. yeast
1/2 tsp. salt
3-4 1/2 c. flour
In a large bowl (the bowl of your mixer, if you have one), combine water, sugar, and yeast. Let stand for 10 minutes or until yeast is bubbly.
Add salt and stir. Add 1 1/2 c. flour and mix well. Gradually add more flour (usually between 3-4 cups, depending on your elevation and your humidity) until dough starts to pull away from the sides of the bowl and it barely sticks to your finger.
Spray a glass or metal bowl with cooking spray and place dough in the bowl.
Cover and allow to rise for 45 minutes or until doubled in bulk.
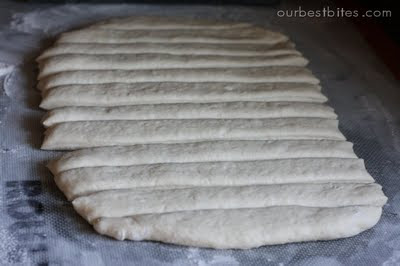
Remove from bowl and place on a lightly-floured surface. Spray a baking sheet with cooking spray. Roll into a rectangle and cut into 12 strips with a pizza cutter.
Roll out each piece of dough into a snake and then drape over your forefinger and twist the dough. Place on baking sheet and repeat with remaining 11 pieces of dough. Try to space them evenly, but it's okay if they're close; pulling apart hot bread is one of life's greatest pleasures!
Cover pan and allow dough to rise for another 30 minutes. Look how fat and happy they are...
When there's about 15 minutes to go, preheat your oven to 425. When done rising, bake for 10-12 minutes or until golden brown. Rub some butter on top of the breadsticks (just put a ziploc bag on your hand, grab some softened butter, and have at it) and sprinkle with garlic bread seasoning or the powdery Parmesan cheese in a can and garlic salt.
Or you could sprinkle them with cinnamon sugar. I did that once. It was awesome.
Sugar Cookies
Sugar Cookies
Print text only
1 C real butter (no substitutions!)
1 C sugar
1 egg
1 1/2 t almond extract (or other flavor of your choice, like vanilla)
3 C flour
1 1/2 t baking powder
1/2 t salt
Print text only
1 C real butter (no substitutions!)
1 C sugar
1 egg
1 1/2 t almond extract (or other flavor of your choice, like vanilla)
3 C flour
1 1/2 t baking powder
1/2 t salt
Cream butter and sugar until light and fluffy- about 2 minutes. Add in eggs and extract and mix to incorporate.
In a separate bowl combine flour, baking powder and salt and whisk to combine. Slowly add the flour mixture to the butter mixture and mix until completely combined.
Shape the dough into 2 flat disks and wrap in waxed paper and place in the fridge to chill for 1-2 hours. If you want your cookies to hold their shape well, the dough needs to be really chilled.
**A great time saving tip is to immediately roll dough between 2 sheets of waxed paper and place on a flat surface in the fridge. It will chill super fast and be ready to go in no time.
When you're ready to roll out dough lightly sprinkle flour onto your work surface and roll out dough with a rolling pin.
Warning: Tangent. One of my favorite kitchen accessories of all time is the Roul'Pat. It's an over-sized Silpat and it's made for working with doughs. It's also great for candy and sooo much more. It stays firmly in place on the counter and nothing sticks to it. They're pricy, but so so worth it. I honestly use mine for something or other just about every day. Rolling sugar cookie dough on a cutting board is annoying, and the thought of doing it right on the counter gives me the heebie-jeebies. Just imagine what's on your counter top and it's all getting stuck in your dough! Anyway, the Roul'Pat is perfect for rolling cookie dough so just ask Santa for one. Wait, do you have a Silpat?? Because you need one of those too! Everyone needs a Silpat, it will change your life.
Alright now, cut out those cookies. Thick or thin, however you like it...
If I'm not going to frost them, I like to sprinkle them with coarse sugar. It looks like glitter, doesn't it? It adds something extra, makes them look pretty, and tastes good.
Bake at 350 for 8-12 minutes. The baking time really depends on how you like them. If you like them really soft under-bake them. In my oven, about 8 minutes does it. However if you're making large cookies, or ones with small parts or heavy frosting, you might want to be careful because they might break when they're super soft.
About 8 minutes will get you a really soft cookie, a few minutes longer (when they start to just brown around the edges) and you'll get just a little crispiness around the edges and then a soft center, and bake even longer (and roll thinner) and you'll get a buttery, crispy cookie that will just melt in your mouth. Any way you do it, they'll taste good. Remove onto cooling racks when you're done and let cool completely. I honestly think these even taste better the second day.
Frost any way you like. If I'm making sugar cookies merely for the purpose of eating them, then my preference is a big swirl of almond cream cheese buttercream, hands down.
If I have a pretty shaped cookie like the ones in the pictures, sometimes I'll just pipe on a decoration. (And don't mind the messy piping here, my icing was super hard so it's full of bumps!).
And if I'm packing to give away, or serving at an event or party, then I like to use Glacé Icing.
Cheese and Tomato Tart
Cheese and Tomato Tart
1 recipe for pie crust (or just use a pre-made pie crust if you're short on time)
3/4 c. light sour cream
1/3 c. light mayonnaise (NOT Miracle Whip)
1 Tbsp. coarse grain or Dijon mustard (I'm using Emeril's horseradish coarse-grain mustard)
1/2 tsp. Kosher salt
1/4 tsp. freshly ground black pepper
1 small onion, minced
4-5 cloves garlic, minced or pressed
2-3 Tbsp. butter
8 oz. pepper jack cheese, shredded
3-4 fresh, ripe Roma tomatoes
Preheat oven to 400 degrees.
Prepare pie crust and place in the bottom of a 9" pie plate. Set aside (preferably in the fridge).
Heat butter in a medium skillet over medium heat. Saute onions and garlic until tender and fragrant. Set aside and allow to cool.
In a medium bowl, combine sour cream, mayonnaise, mustard, salt, and pepper. Stir in cheese. Set aside.
Slice tomatoes about 1/4" thick and layer in the bottom of the pie plate. Top with cheese/sour cream mixture
Bake for about 25 minutes or until crust is golden brown and the top is bubbly. Remove from oven and allow to stand at least 30 minutes in order to set. Cut into 12 wedges and serve!
This can be served by itself as an appetizer or with a spinach or Romaine salad with a light vinaigrette for brunch. Or a snack pretty much any time you want... :)
Oh, and let's not talk (but I guess we are talking) about my ugly pie crust. There are some people (cough...Sara...cough) who just seem to never be able to do anything wrong and then there are people like me who try something that other people (cough...Sara...cough) do and screw it all up. I discovered when making my pie crust that I was nearly out of shortening, so I used butter instead because Sara likes her pie crusts made with butter. It was pretty much a hot mess from beginning to end and I didn't like the finished texture or flavor of it with this particular dish. So lesson learned: always shortening in the pie crust for this recipe...
Ice Sculpture World
About the artist - Paul Germain is a professional ice sculptor and ice carving instructor who resides in Fresno, California. He is also the founder and director of the Academy of Ice Carving and Design.
He created his first wedding ice sculptures in 1974. His highly celebrated ice carvings and ice sculpting performances have been featured in over 75 local and international newscasts, publications, TV talk shows, and art museums. Paul's spectacular ice carvings have been displayed in an enormous variety of promotions, weddings, proms, company parties, grand openings, conventions, tradeshows, Christian church youth ministries, and other special events.
He created his first wedding ice sculptures in 1974. His highly celebrated ice carvings and ice sculpting performances have been featured in over 75 local and international newscasts, publications, TV talk shows, and art museums. Paul's spectacular ice carvings have been displayed in an enormous variety of promotions, weddings, proms, company parties, grand openings, conventions, tradeshows, Christian church youth ministries, and other special events.
Every ice design is meticulously carved by hand. Paul Germain has been developing innovative ice carving techniques for over 30 years. Paul has a Bachelor's degree featuring the highestlevel. He also holds a Master's degree in Education/Instructional Leadership. His stud honors in Art, and is fully credentialed by the state of California to teach Art at any ents' works have been critically acclaimed, and have been displayed at the Fresno Metropolitan Museum of Art, Congressional Art Exhibit in Washington, D.C., and many other honorary venues.
Ice Sculpture of New York
Palace Hotel Reviews
Ice Tower
Ice Temple
Subscribe to:
Posts (Atom)


